Showing posts with label buttermilk. Show all posts

Monday, January 04, 2016

Buttermilk Fried Oysters

Fried oysters aren't something one eats everyday, but down South, we seem to find them on the menu more often than not. I love fresh shucked oysters, too and my first husband and I used to eat these as often as we could, wherever we could find them. I think living on the East Coast, probably any coast for that matter, means you may get them fresher more often.

One of my closest friends lives in Seattle and one of my favorite memories is of visiting her one year and taking a drive in the Washington mountains. Tucked away off the road was a tiny little restaurant carved out of the cliffside that had the most amazing porch style dining area with spectacular views of the oyster fields, far down near the water below at the base of the mountain. 

When you have fresh oysters like that, it's hard to imagine anything more sublime. Except maybe oysters on the beaches of of a sleepy fishing village in France... Or maybe on a visit up the East Coast to see my cousins in Virginia Beach where we can harvest them ourselves.

Oysters to me are treasures of the sea so to fry them, isn't necessarily my favorite way to have them. After all, nothing beats a fresh shucked oyster naked in its shell. Or simply dressed with champagne or red wine vinegar and shallots. Or heck, one of my favorites, with Tabasco and horseradish. Or with a little sour cream, caviar and green onion.  Jeez, I really do love 'em no matter how I have them prepared.

But Southern fried everything is prevalent where I live so instead of typical bar-fare of mozzarella sticks or fried mushrooms like you might see up North, we tend to see a lot of fried seafood. And don't forget the pickles. We love fried pickles.  Fried oysters, fried clams, fried conch fritters, Key West shrimp, gator, catfish, okra, softshell crab... it's hard to say no even if fried isn't exactly your thing. And yet, it's so my thing when it's done well.

It's beer food. Perfectly delicious, fresh, local snackalicious beer-food. And one of the first times I had fried oysters was after a long day at the beach at an extremely popular joint in Jupiter called the Food Shack. Bad to the bone, this little place that is practically standing room only with a line of people waiting for it to open it's doors. Worth the wait as everything on the menu is worth having and it makes making a selection awfully hard when the food is this fresh, this local and quite tropically inspired.

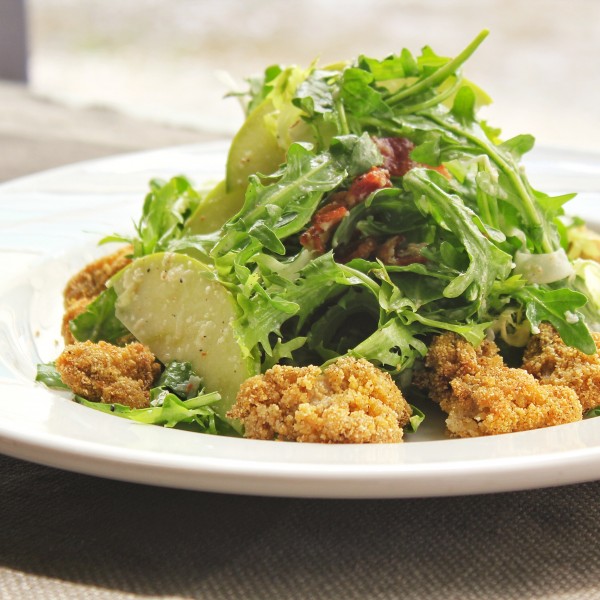
An all time favorite, which we have every time we go, is the panko-fried oysters on a bed of greens with homemade cilantro ranch dressing, red onions, fresh seasonal fruit. May not sound like it goes together, but trust me, it is divine.

So to replicate this awesome little snack, I picked up some fresh Willowpoint oysters that you can get fresh at Costco on the weekends. Already shucked in sealed canisters on ice, it's a steal of a deal. About a dozen in their own liquid for about $8. I will usually pick up 2 or 3 because we love oyster shooters, oyster stew and of course, now, fried oysters on a kickass salad.

Here's what you need:
Fresh oysters, shucked
Buttermilk
Flour
Rustic Tuscan seasoning from Costco
Paprika
Crushed red pepper, optional if you like a little kick
Peanut oil for frying

Prep:
  1. Prep your oysters a day or two ahead. If you buy canned fresh oysters at Costco like I do, drain the oyster liquid and reserve it for something else, like oyster stew. The liquid freezes quite well and does come in handy in my household as we do make oyster stew quite often. 
  2. Refill your oyster canister, with the oysters still in of course, with buttermilk. Cover and keep refrigerated until you are ready to fry. Not less than an hour, no more than 2 days. (I make my own buttermilk as you may already know and always have it on hand. I'm sure I have a post about this somewhere if you want to make your own buttermilk, too.)
Flour Dredge and Fry:
  1. Once you are ready to fry, preheat your fryer with peanut oil to about 340 degrees. You can pan fry or use a deep fryer, whichever you have available.
  2. Drain your oysters from the buttermilk and reserve this liquid for stew, if you like. You can put them on paper towels and lightly salt and pepper the oysters before dredging in flour.
  3. In a small dish or on a plate, add flour and seasonings. I didn't give measurements as it really depends on how many oysters you will be frying so use your best judgement when seasoning your flour. About a teaspoon of each seasoning to a cup of flour is a good rough estimate.
  4. Gently dredge your oysters in the seasoned flour and fry for about 3-4 minutes or until golden brown. Drain on paper towels and serve immediately.
We eat these on their own or on greens as a salad. I make a delicious buttermilk ranch dressing with Hidden Valley seasonings, homemade buttermilk, homemade mayo and minced garlic. You can't go wrong with that either to dip them in or as a dressing.

The texture of the oysters stays creamy dreamy while the buttermilk adds great flavor and tang combined with the crunch of the breading. Optionally, you can add panko crumbs to the seasoned flour for a little extra crunch, which we love to do when we have panko in the house.

**Alternatively you can serve these on their own, just as they are. Sometimes, we have leftover oysters that we like to fry up the same way and serve with homemade marinara. Super yummy and they never last terribly long!

Monday, December 24, 2012

How to Make Quark

This year was an amazing year in regards to my culinary education.  I usually make New Year's Resolutions and for 2012, most of my resolutions centered around exploring new things and improving upon my limited knowledge of other things. This year, for me, was all about documenting my experiences with the things I personally enjoy the most, which are gardening and cooking.

On the list were things like:

  1. Learn how to make cheese.
  2. Learn about raw diets and improving health
  3. Grow better beets.
  4. Improve my techniques for propagating roses.
  5. Practice acceptance and tolerance.
So, it's clear some of those items are lifelong ambitions. I'm ok with that. I recognize the importance of learning new things, improving old skills and practicing a wide range of objectives I am neither new to or good at, but one of my passions is food and as such, this gives me quite a wide canvas with which to practice, practice, practice.

I made quark for the first time this year and after seeing how easy it was, it is really hard to imagine why this lovely, creamy, soft cheese isn't available here in the U.S.  At least, I've never seen it in a store and the closest thing I have seen is what the ethnic groceries call "farmer's cheese". No idea yet whether this is the same, but something tells me it is not.

Quark (pronounced just like it looks) is the European's version of  "philly" cream cheese. In fact, when you are in Germany or Austria, they may not know what cream cheese is but if you say "Philly", they know exactly what you mean.  They look similar but they are not at all the same ball of cheese. 

Americans have not been properly introduced to this delicacy, so I am happy to do the honors if this is new to you, too.  Trust me, you will love this cheese if you have any cheese loving qualities in your heart at all. It is not only easy to make at home but it can be eaten sweet or savory, as well.

Ingredients:
  1. 1/2 gallon of organic cultured Buttermilk (as fresh as possible; check the dates!)
  2. 1 gallon of organic whole cow's milk (as fresh as possible; check the dates!)
How to Make Quark:
  1. Let milk come to room temperature and then combine the milks into a large stockpot that can hold your milk. You can use more or less of the two milks above. Those ratios don't have to be exact. This ratio is a bit overkill and lazy, however, it works well. Regardless, I try to use at least a 1-4 ratio of buttermilk to milk.  Use a pot with a lid so you can keep it covered while it does its magic.
  2. Let milk sit at room temperature overnight or up to 48 hours. It shouldn't take that long but since this is a mesophilic culture, it means that this culture requires "meso" or medium temperatures to culture properly. In cheese language, that means not too hot or cold, so warmish room temperatures are ideal. In the winter in Minnesota, it can take almost two days if my kitchen is on the cool side.
  3. Once the whole pot has cultured, it will look almost solid, like a good set jello mold and it is ready.  You are supposed to cut the quark with a long knife or spatula in a grid pattern. This creates the "curd" and allows it to separate from the whey. Curds and whey? Little Miss Muffet was probably making quark... Not entirely necessary but kinda fun in a messy kid sort of way.
  4. Strain the quark to drain off excess whey.  Here, you can make it as dry or as soft as you like. The longer you strain it, the dryer in texture. Too dry, it gets a tad crumbly but some Germans like it this way. Too wet and the cheese will weep a bit, pooling whey in the cheese, which some Germans also like. It's up to you so test it along the way to see what you prefer.  And in case you didn't know better, save the whey! It is very nutritious and you can use it to make bread, soup, stock, broth, or feed your plants. Seriously, it is just as valuable as the cheese itself.  You can even drink it.
What to do with it?
  1. Make German Cheesecake, duh?!
  2. Make Breakfast quark - German equivalent to yogurt with fruit preserves or fresh fruit. They love pineapple. Interesting and true.  This is pineapple, quark and condensed milk for sweetness. Super yummy.
  3. Add chives, onions, salt and pepper and serve it with baked potatoes. You won't go back to sour cream... ok, maybe you will want this AND sour cream. :)
  4. Spread it on toast with some jelly. By now, you know what to do with this... if not, figure it out because it is some righteous cheese. 
  5. Make Stollen!!  oh yea!  one of my all time favorite Christmas classics, unplugged! I will post my recipe for that in my next post hopefully because my first try rocked my world and the secret ingredient was in fact, my homemade quark!  This is even better for Christmas than my Dad's favorite Christmas raisin bread.
If you don't know what any of this is... then open your mouths, your bellies and your minds, American friends because you are about to be blown away by this little cheese with a million purposes. All good eats, no matter who you are. Unless of course you are allergic to dairy then we have to find something goat-y for you... I made a chevre cheesecake last week and that was pretty darn easy and awesome, too, so stay tuned and by all means, let me know how this works for you.